Friday 22 November 2019

DONATE YOUR EYES - HELP SOMEONE TO SEE THE WORLD WITH YOUR EYES AFTER YOUR DEATH

India ended 2018 with a population of 1,352,617,328 people, which represents the increase of 13,958,493 people compared to the Indian population in 2017. The numbers clearly shows there is a huge increment in the population every year which leads us to problems like Increase in unemployment number, Increase demand of food products, Disturbance in land distribution majorly affecting the agricultural land etc. With the addition to these problems one more problem is growing rapidly in the country which is the number of blind people in the country. According to the Lancet Global Health Report (2015) 8.8 million people were found blind in India and another 47.7 million people were had moderate and severe vision impairment. It is predicted that the count of blind people will reach to 115 million people by 2050.


Causes of Eye Blindness

There are several causes of blindness which are clearly shown below in the form of pie chart.


Solution to the Problem

According to the survey total number of Average deaths everyday in India is approx 62,389 , it is predicted that if every person will donate his/her eyes within 11 days India would be a blind free nation. But only 25,000 eyes are donated every year by indians out of which 70% are only used (due to various reasons). The root cause of not donating the eyes is due to lack of awareness in people, also due to mythological beliefs and so on. But donating your eyes would help someone to see the world through your eyes after your death.

Who can be a eye Donor?


  1.  It is practically possible to to donate eyes even after 1 year of age with no upper limit of age to donate the eyes.
  2. People who wear spectacles, who have undergone cataract surgery, diabetics and those who have hypertension can donate their eyes.
  3.  People blind from retinal or optic nerve disease can also donate their eyes.
Note: The Ultimate decision about usage for transplantation will be made after evaluation by authorized doctors.

Who Cannot be a eye donor?

The person who cannot donate his or her eyes would be due to following reasons
  1. Death from unknown Cause.
  2. Death due to infectious caused viz Rabies, syphillis, Infectious hepatits and AIDS.
  3. Any frank ocular infection, previous refractive surgery.

Precautions to be Followed

There are certain precautions to be followed after the death of donor is as follows

  1. Eyes need to be collected within the first six hours of donors death. Therefore inform the nearest eye bank as soon as possible.
  2. After the donor's death close and covered his eyes with moist cotton.
  3. Raise the head end of the body by about 6 inches.


I request each and every individual to TAKE A PLEDGE TO DONATE YOUR EYES AFTER YOUR DEATH.

For more details contact your nearest Eye Bank Soon.

Sunday 6 October 2019

Visit to Bio-Methanation Plant at Palava City

In the Tier-1 cities like mumbai, delhi, kolkata the population is increasing on a higher rate which leads to many problems like scarcity of water, scarcity of land use, traffic problems, crowdy junctions etc. One of the major problem accounted is waste management. According to ministry reports, India generated nearly 1.45 lakh metric tons of waste per day till february this year out of which only 53% of waste was processed. Due to increasing population in urban areas there is a huge gap between the waste generated and waste processed. To overcome this problem government has come up with waste management policies and trying to adopt the part to whole form of policies to increase the percentage of waste processed. Bio-Methanation Plant is one of the best alternative to treat organic waste and to create wealth from waste. Therefore it is important to understand the working process of Bio-Methanation Plant.


Bio-Methanation Plant Process at PALAVA CITY

The process is divided in  steps which are perform one after the another to treat the waste generated or collected.

Step 1: Waste Collection 

In this step the waste was collected from the waste collection points inside the palava city. The waste is collected through waste collection trucks. The primary concept that is very important to be taken care of is 'segregation at source'. Adoption of this concept helps to save ample of time used to segregate of waste in Bio-Methanation plant.

Step 2: Weighing of Waste Trucks & Unloading of Waste

After the waste is collected from the township the waste trucks are weighted on the weighing pan, so as to calculate the amount of incoming waste to plant. The capacity of the Bio-Methanation Plant at Palava city is 15 tones per day (TPD). Once the weighing of waste trucks is completed the trucks are sent to unloading point to unload the waste.
Weighing Pan

Step 3: Segregation of Waste

The Unloaded waste is then transferred on 'Feed Conveyor' to conduct the manual segregation of waste. The inorganic waste material is segregated by the local waste pickers but full segregation of waste is not possible manually therefore further the manually segregated waste is transferred to Trommel through the inclined conveyor. The trommel consists of two circular nets of 10mm and 50mm dia. The 10mm net is used to remove the dust particles situated in the waste and 50mm net is used to segregate the inorganic waste. The retained inorganic waste is collected and send to Nashik plant for using it as a raw material to generate fuel.

TROMMEL

Manual Segregation

Step 4: Shredder Table Process

In this process the segregated organic waste (approx 5TPD) is transferred to crusher with screw conveyor. With the help of crusher the the organic waste is transformed into smaller pieces and is transferred further to Shredder Table. On shredder table the crushed waste is been diluted with fresh water or recycled water (mainly used only at the initial working phase of plant and later on the recycle water from anaerobic digester is used). This process is carried out to make wet form of waste.
SHREDDER TABLE 

Step 5: Chambers Setup

Three chambers are setup of which 2 Inlet Chambers and 1 outlet i.e. recycle chamber is setup. The function of Primary Inlet chamber is to collect the wet form of waste and transferred it further to Anaerobic Digester, whereas the secondary chamber is used to store the wet form waste when primary chamber is full. The outlet chamber that is the recycled chamber collects the overflow wet form of waste through overflow line from anaerobic digester and transfer it to shredder table to reuse it to make wet form of waste.

CHAMBER PIT

Step 6: Digester System

In this step the wet form of organic waste is transferred from inlet chamber to anaerobic digester through feed line. There are two digester primary and secondary digester each of capacity 2.5 TPD. Both digester have Scum Beaker arrangement, Sludge line arrangement at bottom, Overflow line at top and Biogas line. The wet waste is pressurised and transformed into gas which is sent to Raw Gas Balloon. The sludge collected is then sent to sludge tank. 
 Digester

Step 7: Balloon Room 

The Balloon Room is set up near the digester to store the gas generated from the anaerobic digester. There is a set up of primary and secondary balloon used to store the gas generated. Gas from these balloons to biogas genset where these gas is used to generate electricity. The excess gas is burned through the Bio-gas Flare setup.

Balloon Room

Biogas Flare
The important aspect that needs to be considered while construction of Bio-Methanation Plant is 
  1. The amount of waste generated per day in the township
  2. location of Bio-Methanation Plant should be set up with consideration of wind direction to avoid odour problems.
  3. Feasibility study (If low amount of waste is generated the Organic waste Converter should be setup).

This Visit was conducted during my internship days in Research & Development Department in JP Infra Mumbai Private Limited. I would like to thank Mr. Vikas Sawant, Shristi Mam, Dhaneshree mam and Prasoon Sir for their through out guidance and support.


Sunday 24 March 2019

Research Proposal

In every academic and professional field the research endeavorus are preceded by a research proposal. Research proposal is something that helps our research supervisor to know total research process that we propose to undertake,and also helps in examine, suitability and validity of the research. In any academic field, our research proposal will have to undergo number of approvals. Unless the approvals are provided we are not able to start our research process. Hence it is very important to study closely what constitutes in a research proposal. It is mandatory to have a research proposal in terms of both Qualitative and Quantitative research. Despite having a similar structure of proposal the difference lies between the methodologies and procedure followed to to conduct the research. 

Picture by - Siddhartha shukla


A research proposal is a overview plan of entire research work that is to be conducted. It is basically a designed strategy to find the solutions of problems and to conclude the objectives of the research. A research proposal should outline the various task you plan to undertake to full fill your research questions. Main function of research proposal is to have a detail operational plan for obtaining answers to the research questions. The research proposal should provide answers to the following stated important points

  1. What are we proposing to do
  2. how we plan to proceed
  3. why we selected the proposed strategy.

Contents of Research Proposal

A research proposal should contain the following information about the study
  1. Introduction (Including a brief literature review);
  2. Theoretical framework;
  3. Conceptual framework;
  4. Objectives or research questions;
  5. hypotheses to be tested, if applicable;
  6. Study design that we are proposing to adopt;
  7. Sampling design and sample size;
  8. Data-processing procedures;
  9. Proposed Chapters;
  10. Problems and limitations of study;
  11. Proposed time frame of the study.
A research proposal should communicate the purpose and plan of the research in such a way that;
  • Enables you to return to the proposal for your own guidelines in decision making at different stages of the research process;
  • Convinces your research supervisor to allow you to work on the research.

Some Important Points to be Considered

Introduction of Research Proposal

Generally  your research topic is introduced in 3 categories (i) Globally (ii) Nationally (iii) Locally.
Always start with a broad perspective of the main subject area you are going to work on, before gradually narrowing the focus to central problem. Always cover the area on following aspects

  • an overview of main area of your research study
  • historical perspective 
  • philosophical or ideological issues relating to topic
  • major theories
  • literature review
  • main problems, issues and advance under the topic
  • important theoretical & practical issues related to topic 
  • main findings relating to core issue.

Objectives of the study

The major points that your research is based on should be enlisted in this section. Always use action-oriented verb such as 'to determine','to find', & 'to ascertain' in formulating the objectives and sub-objectives. Also your objectives should be concluded in the conclusion with help of results and findings.

Hypotheses to be tested

A statement of assumptions about the prevalence of a phenomenon or about a relationships between two variables that you plan to test within the framework of your study is nothing but the hypothesis.
Hypothesis formulation have an obligation to draw conclusion about in report. 

Study Design

The study design should cover detail plan of proving/answering your research questions in descriptive, cross-sectional, before-and-after, experimental or non experimental design. Include all the details of various logistical procedures we intend to follow while executing the study design.

Work Schedule 

You must set a detail work time plan that must act as a guideline to conduct and finish your research within certain time frame.

Saturday 26 January 2019

Research Paper - Format to present your research

Research Paper is used for exploring and identifying scientific, technical & social issues. Research paper is a intellectual  property owned by author therefore it is very important to have a proper, planned and sound research process for your paper. So let us see step wise format of research paper.


Flow Chart of Research Paper


Step 1: The first step to start a research is to define the Title of your paper. The title of paper should be of zero ambiguity. The title of paper should be well defined to address the problem and should be easy for others to understand when read.

Step 2: In step 2 you should define the abstract of your research paper. Abstract is nothing but the summary of your research defining the root gaps on topic and ways to overcome them. Also keywords should be highlighted.

Step 3: In step 3 you should define the introduction of your paper. Introduce your research topic in three sub step format
  1. Global - Introduce your research topic with reference to work done on your topic at international level.
  2. National - Introduce your research topic with reference to work done on your topic at National level.
  3. Local - Introduce your research topic with reference to work done on your topic at local level.
Step 4: In this step you have to define the objective of your research paper. This is the most important step in your research paper where you state or define the gaps/problems you are working on in this research.

Step 5: In this step you have to define the Literature Review  of your paper. Literature Review is the process of analyzing the past research on your  research topic basically through various research paper, articles etc on your research topic. Basically Literature Review helps us to know about what all things and gaps been worked out in world on our research topic in past. Also introduce you to various other gaps on your research. However this is the very first step before making a research paper.

Step 6: In this step you define the methodology you adopted to conduct your research. Generally first step in methodology is Data Collection and second is the Data Analysis.

The data collection can be done in 4 ways -
  1. Collection of Primary Data
  2. Observation Method
  3. Interview method - (i) Telephonic Interview (ii) Personal Interview 
  4. Collection of data through Questionnaire.
This step is also known as Research Design step where you categorized your research design in four sub research designs -
  1. Sample Design
  2. Observational Design
  3. Operational Design 
  4. Statistical Design
Step 7: In this step you conduct various experiments in your research to do various sort of analysis to obtain the required results. This results helps you to get a brief clarification of validity of your assumptions made at the start

Step 8: In this step you conclude your research. In this step it is mandatory to conclude the research based on the objectives you have mentioned earlier on the basis of the results obtained in step 7. If the objectives of research are not concluded then that research becomes pointless.

Step 9: This is the last step of your research where you have to provide the References. References is about the data you have used in your research which was already been published by other authors in past. Giving references is generally citing the papers, articles etc you have used in your research paper from internet. If you fail to cite the research paper you have used then it will be detected in plagiarism report and also may get subjected to copy right act. Therefore it is very important to cite the data you have used.    

Wednesday 23 January 2019

Services Selection Board Interview

Services Selection Board interview

Service Selection Board interview is a six/five days interview, conducted to find out the suitability of a candidate for the armed forces in India. This interview comprises of number of tests, which are designed to check the Officers Like Qualities of a candidate. Once the candidate possess certain OLQ's he/she gets selected for final selection process subjected to medical fitness test.
Source- Google Images.

How to apply for SSB?

To apply for SSB there are basically two modes 1) Direct Mode  & 2) Indirect Mode Entry.

Direct Entry :  In this mode you don't have to give any written test. All you need to do is fill up the form, which is generally online & provide your educational details, based on which you are applying for. There is cut off percentage decided by the concerned authority & candidates who have higher percentage than cut off in their course are called for SSB. Entries like Navy, TGC Army, SSC- Tech Army etc. 

Indirect Entry: In the entries of such type, you have to pass a written examination. The cut off for their score is decided and the candidates scoring above the cut off are called for SSB. Entries like AFCAT, CDSE & NDA.

SSB Selection Centers

Service
Board
Selection Board
Location
Army
11 SSB, 14 SSB, 18 SSB, 19 SSB, 34 SSB
Selection Center East (SCE)
Allahabad, UP
Army
20 SSB, 21 SSB, 22 SSB
Selection Center Central (SCE)
Bhopal, MP
Army
17 SSB, 24 SSB
Selection Center South (SCS)
Bangalore, Karnataka
Navy
33 SSB
Selection Center South (SCS)
Bhopal, MP
Navy
12 SSB
Selection Centre South (SCC)
Bangalore, Karnataka
Navy
NSB
-
Coimbatore, Tamil Nadu
Navy
NSB
-
Navshakti Nagar, Vizag Andhra Pradesh
Air-force
1 AFSB
-
Dehradun, Uttarakhand.
Air-force
2 AFSB
-
Mysore, Karnataka
Air-force
3 AFSB
-
Gandhinagar, Gujarat
Air-force
4 AFSB
-
Varanasi
Air-force
5 AFSB
-
Kanchrapara, West Bengal
 

Days at SSB at a Glance 

Day 0: Candidates report at the given location of railway station on the this day (day 0). Candidates get a call up letter which will contain the details about the location and time when and where you have to report. A representative from the board will accompany the candidates to board premises. Candidates will fill a form at board. Mostly on day 0 no testing is conducted, however for AFCAT entries there is no day 0.

Day 1: This is the day when screening is held. The phase-1 test is held in morning & results are after lunch. The candidates who are not selected are dropped back to the railway station. The remaining candidates are asked to fill up very important form today which is the Personal Information Questionnaire  (PIQ Form).

Day 2: The phase-2 test begins from day 2. The first in line will be the psychological test. For candidates applying for Air-Force and are not through NDA/CDSE you will be asked to give Pilot Aptitude and Battery test (PBAT).

Day 3 & Day 4: You will get an advance routine of your tests in AFSB's and in other boards too you will be informed much in advance. On Day 3 & Day 4 your group tasks and personal interview are done. Groups are divided according to chest numbers.

Day 5: This is the final day of interview Board Conference is done for all the candidates. The candidates who are recommended are retained for medicals and sometimes for PBAT.

 Test in SSB

Phase-1 Testing
  1. Officers Intelligence and Rating Test (OIR)
  2. Picture Perception & Description Test (PPDT)
Phase- 2 Testing
  1. Psychological Tests- i) Word Association Test (WAT), ii) Thematic Appreciation Test (TAT),                                      iii) Situation Reaction Test (SRT), iv) Self-Description Test (SDT).
  2. Group Tests
  3. Personal Interview
  4. Board Conference
  5.  Pilot Aptitude and Battery Test (For Flying branch only) 
 

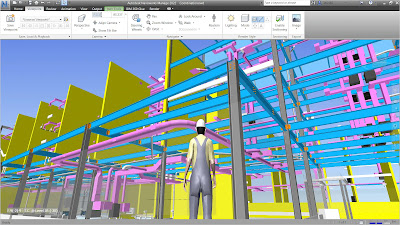
3 Simple Steps to Create 3D Walkthrough using Navisworks

3D Walkthrough is created for an exciting experience to showcase exact replica of project that will be created in future. Walkthrough movie ...