Monday 27 February 2023

3 Simple Steps to Create 3D Walkthrough using Navisworks

3D Walkthrough is created for an exciting experience to showcase exact replica of project that will be created in future. Walkthrough movie or video is basically a computer programed animation created to show detailing of particular project to various stakeholders involved in the project. It helps for better visualization & to get brief idea of multiple disciplines involved in the project. Introducing 3D walkthrough in residential projects has been a game changer not only for designers, project managers but also for consumers to get brief idea of what really are they investing it. 

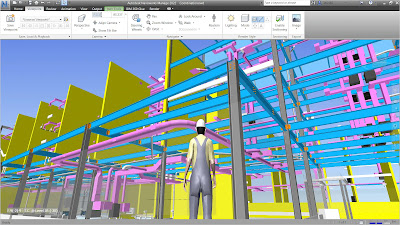
3D Walk through in Navisworks (Source - Google)

Step 1 - Transferring 3D Model from Revit to Navisworks 

To create a 3D Walkthrough, it's very obvious that we need to create a 3D model based on CAD Drawings of a particular project. Once the 3D model is created in Revit software, we need to transfer it to Navisworks in either .nwc or .nwd format. 
  • To transfer the Revit file, click on Revit Icon on top left corner.
  • Then select save as option and save the file in .nwc or .nwd format. 
  • Now Open Navisworks, Append the same file in Navisworks. The 3D model will appear in Navisworks Interface.
Navisworks Interface (with Append option highlighted)

Step 2 - Use of Animator option in Navisworks 

Once all disciplines models are append in Navisworks, we then have to proceed with animate option to showcase the model path, to showcase project progress or to showcase the moments of machinery of certain project. In 3D walkthrough we intend to create exact replica of what the project would be in future.

  • Select the Animator option from 'Home' tab in Upper Ribbon.
  • Animator tab will appear on screen (on lower side as shown in reference image 1).
  • Now Add Scene in the Animator tab & Add camera in created scene to add the path. (Right click and select add Scene. Now right click on scene and select add camera --- Select Blank camera.)

Reference Image 1


Reference Image 1
  1. Append option to import .nwd or .nwc files.
  2. Animator option 
  3. Setting up Scene and Camera


Step 3 - Animation Timing & Path 


Setting up the path for walkthrough with time aspect is one of the major steps in creating 3D walkthrough. following are the steps to set path and timing -

  • Click on the Camera (added in scene explained in step 2) to active it. 
  • Click on the camera icon to get Viewpoint and set timing for that particular patch as shown in reference image 2 below.
  • Set the path of walkthrough with mouse scrolling options and set the timing at each viewpoint. continue the process till end viewpoint.
  • Once we have completed the process of attaching path and timing to 3D model, we can export the walkthrough video by selecting Animation option from top bar and selecting Export animation option.
Reference Image 2

Thanks to Mr Vishal Verma for guiding me on "How to create a 3D Walkthrough in Navisworks".

Tuesday 27 December 2022

BASIC INITIAL SETTINGS IN ARCHICAD FOR STRUCTURAL MODELLING

Introduction 

Building Information Modelling is one of the emerging trend in construction industry majorly post Covid. AEC industry of India contributes nearly about 11% of India's GDP with participation of 35 Billion people leading to second largest industry in India. BIM is a process to generate clash free 3D Information models through group of software's. ArchiCAD being one of the software used to create 3D informational models. ArchiCAD is developed by Graphisoft a Hungarian Company. ArchiCAD offers computer aided solutions for handling all common aspects of aesthetics and engineering during the whole design process of the built environment buildings, Interiors, urban areas etc. Let us see the procedure of constructing a structure model in ArchiCAD.


Procedure 


1. New Project CreationAssuming you have installed the ArchiCAD 24 version in your PC Now create a new project from File option in top bar i.e. File tab (top left bar), select new option and click on New project tab. 


FIGURE 1
New Project Tab


2. Adding Story Levels -  The First step to create a structural model in ArchiCAD is to set the story levels by giving command Clt+7 the following tab as shown in picture will appear on screen. Refer levels form Architectural Elevation for Superstructure & Section from Foundation Plan for Substructure levels. The naming standards for story's will be same as that of naming standards followed in respective CAD files.


Story Settings Tab


3Creation of WorksheetsAfter setting the story levels the next step is create the Worksheets. In the right corner of screen, you will see the worksheet option right click on it & select the new Independent Worksheet option the following tab will appear on screen. Name the worksheet as per requirement & create the worksheet.


Worksheet Tab


4. Adding Structural Drawings in Worksheets -  There are basically two ways to add drawings in worksheet as shown below.

Option 1 -  From top bar select File option - External Content  - Attach Xref, once done the following tab will appear on the screen. Select on Browse & add the structural drawing from saved folder in your PC. (In select missing file tab select skip all). Once the drawing is attached in the worksheet (in case drawing is not visible click on zoom out option in lower tab) right click on the drawing & unlock all layers.

Adding Drawings in worksheet by option 1

Now to set a Reference point select a point or intersection point of grids as reference point & overlap that point on ‘x’ mark in worksheet as shown in below figures.  Use command Clt+D to move the drawing.

Marking the reference point


Overlap reference point with CAD Drawing


Note this reference point will be same throughout the worksheets of buildings so as to trace drawings with same reference at different levels.


Option 2 -  From the left side bar select the Document tab - Drawing tool click on some point in the worksheet (Relink drawing tab will appear) Select on the browse option, select the unit & attach the drawing from your PC. Rest adapt the same procedure to set the reference drawing.


5. Trace the worksheet on Floor Plan -  Right click on the created worksheet & select the Trace as reference option.  Now open the story of same drawing & Click on the trace icon (Alt+F2) from top bar.


Tracing of Worksheet 


Most useful commands in ArchiCAD 

  • Clt+T Command -  When you select any element & press control + T command you will find the element selected tool settings will appear on screen.
  • Geometry & Positioning Settings -  Here you will find the Story settings where you can set the home story of an element settings & can also set the top story. Also here you can set the material layer & Reference Plane.
Geometry Settings

 
  • Floor Plan & Section Settings -  In this part the first option would be ‘Show on stories’ which consists of two sub – options 
  1. All relevant stories – It means the selected elements would be shown on all floors as trace mark for reference in editable form.
  2. Home Story only – In this option the elements are visible only on home story.
  • Outlines - In this function you will find the options to edit the edges colour of different elements.
  • Classification & Sections – This option consists of ID & Categories option were we can feed ID number to different elements which can be used in schedules derive for quantities.

Element Selection Settings 

  • Creation of Layers – The shortcut to active this command is Clt + L, once this command is active the tab as shown in fig will be displayed on the screen. To create the new layers select the option new from right corner & set a name for the layer. The layer will appear on the display board. 
Layer Creation Tab


Wednesday 25 May 2022

Applications of BIM 3D, 4D & 5D in Indian Construction Projects

Indian construction industry is growing rapidly, despite of low percentage of growth due to covid impact the industry is likely to register growth of 10.7% in FY22. Indian government has come up with huge investment in Infra sector with sole purpose of uplifting the construction sector growth. However the unproductive issue is the major challenge in the sector which leads to time & cost overruns, this is where the BUILDING INFORMATION MODELLING comes in picture. BIM has the capability to Visualize & Plan the project right from initial phase to final phase. 


BIM DIMENSIONS

  • BIM 3D - BIM 3D refers to "Information Modelling or Information Model" were 2D drawings are converted into 3D models with inclusion of 3 geographical dimensions (x, y, z). This enables the user to visualize the project in all there parameters. 
  • BIM 4D - The fourth Dimension of BIM is "Time" were the schedule details are added to the 3D model (LOD 300) to create Planned Vs Actual Simulations, Various forms of Look ahead's in terms of Project progress, Material requirements & Labour requirements. 
  • BIM  5D - The fifth Dimension of BIM is "Cost" were the cost details are added to 3D model. It helps to predict budgets at initial stages as well as helps to track project in terms of cost till the completion stages. 


BIM WORKFLOW (3D, 4D & 5D) 


BIM WORKFLOW


BIM Workflow is divided in two parts 1. Pre-Construction Phase & 2. Construction Phase, explained in detail in following Steps

Part 1 - Pre-Construction Phase


Step 1: 2D CAD Drawings Requirement

Initially we require all sets of detailed designs or Good for Construction 2D CAD drawings of all disciplines (Architecture, Structure & MEP). Once these drawings are avaliable it is very important to store them in proper data management systems like BIM 360 Docs which helps to track the revisions of particular drawing. 


Step 2: Schedule Development 

As per the project scope the schedule model is prepared were activity sequence is created and relationships of project progress are assigned to them with duration i.e. Planned Dates, further the Actual dates are updated as per the project progress. The main objective of creating a project schedule is to analyze the activity sequences, resources requirement, duration of project & schedule constraints. Once the approved schedule from client side is avaliable Naming standards for Model development are prepared that helps in smooth linking of 3D model with Time aspect.

Example of Naming Standards of Substructure works

WBS L1 - Tower Name
WBS L2 - Structure Works
WBS L3 - Sub Structure 
WBS L4 - Basement 3 (Floor Names or Level Names)
WBS L5 - Element Names (Columns, Beams, Staircases, Ramps, Slabs, Footings etc.)


Step 3: Model Development 

Once the drawings are avaliable models are developed discipline wise by the respective modelers. The Request for Information i.e. RFI are created and send to respective discipline consultants in case of any discrepancies in drawings. Also it is very important to provide model with the assigned naming standards as per the project schedule. Clash detection process is conducted once all 3 disciplines models are avaliable. Clashes encountered in the process are resolved and a Clash Free coordinated model is created. 

Modelling Software's -  Revit, ArchiCAD, Civil 3D, Buildertrend, BIM Object etc.

Clash Detection Software's -  Navisworks, Bexel Manager, Solibri etc.


Step 4: Attaching Time Aspect to 3D Model

After the development of Constructible Model we are in position to link project schedule with 3D Model. As we have given the naming standards in 3D model as per project schedule it becomes very easy to link the dates in software's like Autodesk Assemble, Bexel Manager etc. In the attached image below we can see on the right side all model properties are arranged where as on left side imported project schedule can be seen. Linking both of them with planned and actual dates helps to get various reports as mentioned below - 
  1.  Planned Vs Actual Simulations.
  2. Monthly Look Ahead Plans.
  3. Monthly Labour & Material Requirements (when Labour Constants are avaliable from site team).
  4. Monitoring of Milestones.
  5. Critical Path Monitoring.

Software's - Bexel Manager, Assemble, Synchro etc.


Link Rules tab from Bexel Manager 
Source - Bexel Manager Website

Step 5 -  Attaching Cost Aspect to 3D Model

Cost attachment is bit difficult task than attaching time aspect to the model. If the cost is attached in the schedule itself it becomes very easy to link the cost items with model & schedule elements. But when we get the cost through Budget it is a lengthy process. We need to create a cost classification as per the schedule activities. Also the cost needs to be adjusted of the non model elements like Anti Termite Treatment to milestones costs. Once the cost are classified  as per schedule elements we follow the same procedure to link cost with model elements. Linking both of them with planned & Actual costs helps to get various reports as mentioned below - 

  1.   Monitoring of Schedule invoice.
  2.   Monitoring of Planned cost with Actual cost.
  3.   Preparation of Job Cost report.
  4.   Monitoring of Schedule Direct & Indirect Cost.
  5.   Monitoring of Sale Projections.
Software's - Bexel Manager, Assemble, Synchro etc.

Sunday 15 November 2020

Construction Contracts: Work practices and procedures through client's eye

The main objective of Contracts Department is to set guidelines for screening and shortlisting of suitable contractors for awarding contract of work.  In other words Contract department handles all the supply and apply works of construction field. Also contracts departments drafts contracts with general conditions and special conditions of contracts based on the tender document for various construction activities. Further the selection & performance evaluation of contractors and subcontractors is also in scope of contracts department.


Inter-Departmental Coordination of Contracts Department


Workflow of Contracts Department


Receiving Request The requests list for contractors from sites is been raised for  several construction activities. Usually this process is handled by contracts department independently at the start of project and as the project progress process is handled combinedly with site department.

Identifying Potential Contractors - It is the responsibility of Contracts department to  identify potential contractors as per scope of work as required by site execution team. Contracts department identify potential contractors through 4 major process as follows 

  1. Existing & past sources who have performed well in past works with the organization.
  2. Senior management sources.
  3. Construction job directory.
  4.  Monitoring & follow up with contractors working on similar project with competitors.

Scrutinize top 3 contractors - Once the list of contractors for specific scope is made contracts department scrutinize the top 3 contractors on predetermined parameters and past records of contractors performance.

Negotiation Meets -  Negotiation Meetings are organized with all top 3 scrutinized contractors to discuss the terms and conditions of contracts and create a win win situation for both.

Negotiation results with Comparison Sheet - Once the negotiation meetings are over with all 3 contractors a comparative sheet is prepared with determined parameters and ranking which ultimately helps to select the contractor for job.

Work Order Preparation -  Work order is prepared once the final contractors is selected. Work order includes all the general conditions and special conditions of contracts which were already discussed in negotiation meets. Mostly FIDIC standards are taken into consideration for preparing work orders.

Award & Approval of Work Order - In this stage the final award of work order is given with both parties approval and later fed into ERP system for further records.

Contractors Performance Monitoring -  It is in the scope of contracts department to monitor contractors performance at regular intervals. This performance reports helps contracts department to develop bond with high performance contractors by offering them new works in future and to blacklist low performance contractors.


Sunday 16 August 2020

Construction Procurement: Work practices and procedures through client's eye.

The main objective of Procurement Department is to procure goods and services designed to meet operational requirements of construction projects to meet project feasibility. Also procurement department installs procurement insurance policies to ensure their organisation operates with integrity. Purchase department plays a very crucial role in site progress as its their responsibility to make material delivered on site as per requirement, so as to avoid hindrances on project site. A part from that department registers the potential suppliers and acquire new vendors.

Inter-Departmental Coordination of Procurement Department


Workflow of Procurement Department


  1. Receive Requisition - A material requisition form lists the items required at project sites and are raised in form of indent by Stores Department to procurement department in ERP i.e. Enterprise Resource Planning. The indent contains name of material, quantity required, specifications of material and lead time. 
  2. Check for Approval - The indent raised at site needs to be approved from concern authority. Once the indent is been approved the indent is processed open for Quotations.
  3. Request for Quotation - Once the indent is approved the procurement department requests for quotation from different vendors.  Purchase manager scrutinizes the requirement with different factors like in terms of cost, criticality of requirement, quality of product, quantity of product, availability, vendor status etc.
  4. Comparing Quotations - After receiving the quotations from all vendors a comparative of all quotations is been prepared. In this comparative a minimum of 3 quotations are required for comparison to select the L1 vendor. However the L1 vendor may or may not be finalized on the lowest landed cost.
  5. Negotiation with Vendor -  Once the L1 vendor is selected, negotiation meetings are arranged to negotiate price, delivery terms, advance payment etc.
  6. Quotation Approval - Once the WIN-WIN situation is attended by both the parties the purchase order is drafted and approved for selected vendor. The Purchase order is approved by Purchase Head when the total price of material is below the organization decidable limit. PO above the limit are approved by Project Head.
  7. Material Received on Site  - Once the material is received on site the material is checked by site supervisor as per the approved sample material. Once the material received is as per the requirement the material is stored in site stores. In case of material is rejected on site due to various reasons it is reported to purchase department also a debit note is filled on PO. A Goods Receive Note i.e. GRN is created as a communication document with Billing Department.
  8. Follow Up - It is the responsibility of Procurement department to take follow up on the materials to be received on site. The material needs to be delivered on site on time for smooth operations at site. Also procurement department needs to communicate with billing department about the payments schedule for supplier as a part of Vendor- Management Relationship.


I would like to thank my mentor Mr. Vikas Sawant sir  for providing me the opportunity to work in Procurement Department in my Internship at JP Infra Pvt Ltd. 

Saturday 27 June 2020

Construction billing: Work practices and procedures through the client's eye.

Billing Department is considered as one of the most important department in construction firms. Ensuring implementation of proper billing cycle and timely payments of contractorssubcontractors and suppliers results in maintaining a proper work progress on site. At times when the work progress is it's peak at site client organizations have to ensure that the suppliers and vendors are getting timely paid. Well planned billing cycle till completion of project will help the firm to calculate the actual cost incurred in the project.  


Types of Bills


Inter Departmental Coordination of Billing Department

Billing department has to coordinate with four major departments i.e. Site Department, Purchase or Procurement Department, Contracts Department and Accounts Department to ensure a proper workflow in the firm.

  1. The site billing department verifies the material received on site is as per the quantity sanctioned in Purchase order (PO). Also Site billing team verifies the amount of work done on site is as per contract terms.
  2. The billing team verifies the standy by supply bills from procurement department.
  3. Billing department coordinates with accounts department with all payments related issues.
  4.  If the percentage of work/ percentage of material quantity allotted to contractor/supplier exceeds in bill then contract departmentprocurement department are consulted.

Bills Certification

  • Supply Bills are generated after the materials are received on site and running account service bills are generated after till the completion of work.
  • Service Bills are generated once a part of  the total work is completed till its full completion.
  • Site-in-charge/ project manager and contractor representative will prepare the joint measurement sheet for all service bills and the submitted measurement sheet shall be cross checked at any time by the site billing team.
  • Once the client representative certified the measurement sheet, then the contractor is allowed to prepare a abstract sheet. 
  • Abstract sheet will comprise rate, quantity, amount, project details, start date, completion date, percentage work done with a format to be signed by site billing team.
  • It is the duty of site billing team to look at all necessary details required and if any corrections are found then site billing team have to guide vendor for resubmission of the bill.
  • The format of bill must be suitable with proper bifurcation of quantity amount and taxes
  • All the details on bill (i.e. Tax invoice No) like Bill date, GST No, Pan No, Name and address of service provider, Breakup of GST on Bill, Value of taxable services, amount of taxes, amount of levies, HSN code etc must be mentioned with stamp and signature of the authorized of the contractor/vendor.
  • Copy of TAX INVOICE will be generated after the attachment of all the documents by the contractor.
  • Once the site billing team certify the bill, the bill is then send to HO with all the necessary documents attached to bill. The documents attached would be work order, measurement sheet, material challans,drawings, test reports, contract compliances etc.
  • When HO receives the bill, and the bill is rechecked by the HO billing team if there will be any error in the quantity or amount then debit/credit note will be generated and same will be sent to the contractor seeking for credit/debit note form contractor as well
  • The bill is forwarded for ERP Entry and approvals after receiving the manual certifications
  • The bills are then transferred to Accounts department where bills are rechecked and the correction bills are resend to HO billing department and correct bills are forwarded for payments.
  • Retention money is processed after successful work completion and once the defect liability period mentioned in work order is over.


I would like to thank Mr. Vikas Sawant sir for providing me the opportunity work in Billing Department in my Internship at JP Infra Mumbai Pvt Ltd  and would also like to thank Ms Dhanashri Wankar and Ms Sonam Rajak for guiding me throughout the post.


Monday 1 June 2020

Series on "Work Flow Process of Construction Departments"


A workflow is a repeatable set of steps performed in a sequential manner over time which enables a system to achieve a goal. As the construction projects are getting way more complex these days it is very important to have a proper workflow to execute projects on time and in successful manner. Therefore it is very important for every fresher to know about the basic workflow of all the departments of construction organization. In construction sector there are 3 major categories which includes Client firm, Contractor firm and Consultant firms and the common departments found in this firms are Planning Department, Design Department, Execution Department, Liasoning Department,Procurement Department, Billing Department, Contracts Department, MEP Departmnet, Human Resource Department, Finance Department, Marketing and Sales Department and the new department coming up is Research and Development Department. 

Therefore in the First Series of "WORK FLOW PROCESS OF CONSTRUCTION DEPARTMENTS"  we would be focusing on 3 departments 

  1. Procurement Department 
  2. Billing Department
  3. Contracts Department 
The above listed departments workflow process will be explained in terms of Client's Perspective, Contractor's Perspective and Consultant's Perspective respectively.

Friday 22 November 2019

DONATE YOUR EYES - HELP SOMEONE TO SEE THE WORLD WITH YOUR EYES AFTER YOUR DEATH

India ended 2018 with a population of 1,352,617,328 people, which represents the increase of 13,958,493 people compared to the Indian population in 2017. The numbers clearly shows there is a huge increment in the population every year which leads us to problems like Increase in unemployment number, Increase demand of food products, Disturbance in land distribution majorly affecting the agricultural land etc. With the addition to these problems one more problem is growing rapidly in the country which is the number of blind people in the country. According to the Lancet Global Health Report (2015) 8.8 million people were found blind in India and another 47.7 million people were had moderate and severe vision impairment. It is predicted that the count of blind people will reach to 115 million people by 2050.


Causes of Eye Blindness

There are several causes of blindness which are clearly shown below in the form of pie chart.


Solution to the Problem

According to the survey total number of Average deaths everyday in India is approx 62,389 , it is predicted that if every person will donate his/her eyes within 11 days India would be a blind free nation. But only 25,000 eyes are donated every year by indians out of which 70% are only used (due to various reasons). The root cause of not donating the eyes is due to lack of awareness in people, also due to mythological beliefs and so on. But donating your eyes would help someone to see the world through your eyes after your death.

Who can be a eye Donor?


  1.  It is practically possible to to donate eyes even after 1 year of age with no upper limit of age to donate the eyes.
  2. People who wear spectacles, who have undergone cataract surgery, diabetics and those who have hypertension can donate their eyes.
  3.  People blind from retinal or optic nerve disease can also donate their eyes.
Note: The Ultimate decision about usage for transplantation will be made after evaluation by authorized doctors.

Who Cannot be a eye donor?

The person who cannot donate his or her eyes would be due to following reasons
  1. Death from unknown Cause.
  2. Death due to infectious caused viz Rabies, syphillis, Infectious hepatits and AIDS.
  3. Any frank ocular infection, previous refractive surgery.

Precautions to be Followed

There are certain precautions to be followed after the death of donor is as follows

  1. Eyes need to be collected within the first six hours of donors death. Therefore inform the nearest eye bank as soon as possible.
  2. After the donor's death close and covered his eyes with moist cotton.
  3. Raise the head end of the body by about 6 inches.


I request each and every individual to TAKE A PLEDGE TO DONATE YOUR EYES AFTER YOUR DEATH.

For more details contact your nearest Eye Bank Soon.

Sunday 6 October 2019

Visit to Bio-Methanation Plant at Palava City

In the Tier-1 cities like mumbai, delhi, kolkata the population is increasing on a higher rate which leads to many problems like scarcity of water, scarcity of land use, traffic problems, crowdy junctions etc. One of the major problem accounted is waste management. According to ministry reports, India generated nearly 1.45 lakh metric tons of waste per day till february this year out of which only 53% of waste was processed. Due to increasing population in urban areas there is a huge gap between the waste generated and waste processed. To overcome this problem government has come up with waste management policies and trying to adopt the part to whole form of policies to increase the percentage of waste processed. Bio-Methanation Plant is one of the best alternative to treat organic waste and to create wealth from waste. Therefore it is important to understand the working process of Bio-Methanation Plant.


Bio-Methanation Plant Process at PALAVA CITY

The process is divided in  steps which are perform one after the another to treat the waste generated or collected.

Step 1: Waste Collection 

In this step the waste was collected from the waste collection points inside the palava city. The waste is collected through waste collection trucks. The primary concept that is very important to be taken care of is 'segregation at source'. Adoption of this concept helps to save ample of time used to segregate of waste in Bio-Methanation plant.

Step 2: Weighing of Waste Trucks & Unloading of Waste

After the waste is collected from the township the waste trucks are weighted on the weighing pan, so as to calculate the amount of incoming waste to plant. The capacity of the Bio-Methanation Plant at Palava city is 15 tones per day (TPD). Once the weighing of waste trucks is completed the trucks are sent to unloading point to unload the waste.
Weighing Pan

Step 3: Segregation of Waste

The Unloaded waste is then transferred on 'Feed Conveyor' to conduct the manual segregation of waste. The inorganic waste material is segregated by the local waste pickers but full segregation of waste is not possible manually therefore further the manually segregated waste is transferred to Trommel through the inclined conveyor. The trommel consists of two circular nets of 10mm and 50mm dia. The 10mm net is used to remove the dust particles situated in the waste and 50mm net is used to segregate the inorganic waste. The retained inorganic waste is collected and send to Nashik plant for using it as a raw material to generate fuel.

TROMMEL

Manual Segregation

Step 4: Shredder Table Process

In this process the segregated organic waste (approx 5TPD) is transferred to crusher with screw conveyor. With the help of crusher the the organic waste is transformed into smaller pieces and is transferred further to Shredder Table. On shredder table the crushed waste is been diluted with fresh water or recycled water (mainly used only at the initial working phase of plant and later on the recycle water from anaerobic digester is used). This process is carried out to make wet form of waste.
SHREDDER TABLE 

Step 5: Chambers Setup

Three chambers are setup of which 2 Inlet Chambers and 1 outlet i.e. recycle chamber is setup. The function of Primary Inlet chamber is to collect the wet form of waste and transferred it further to Anaerobic Digester, whereas the secondary chamber is used to store the wet form waste when primary chamber is full. The outlet chamber that is the recycled chamber collects the overflow wet form of waste through overflow line from anaerobic digester and transfer it to shredder table to reuse it to make wet form of waste.

CHAMBER PIT

Step 6: Digester System

In this step the wet form of organic waste is transferred from inlet chamber to anaerobic digester through feed line. There are two digester primary and secondary digester each of capacity 2.5 TPD. Both digester have Scum Beaker arrangement, Sludge line arrangement at bottom, Overflow line at top and Biogas line. The wet waste is pressurised and transformed into gas which is sent to Raw Gas Balloon. The sludge collected is then sent to sludge tank. 
 Digester

Step 7: Balloon Room 

The Balloon Room is set up near the digester to store the gas generated from the anaerobic digester. There is a set up of primary and secondary balloon used to store the gas generated. Gas from these balloons to biogas genset where these gas is used to generate electricity. The excess gas is burned through the Bio-gas Flare setup.

Balloon Room

Biogas Flare
The important aspect that needs to be considered while construction of Bio-Methanation Plant is 
  1. The amount of waste generated per day in the township
  2. location of Bio-Methanation Plant should be set up with consideration of wind direction to avoid odour problems.
  3. Feasibility study (If low amount of waste is generated the Organic waste Converter should be setup).

This Visit was conducted during my internship days in Research & Development Department in JP Infra Mumbai Private Limited. I would like to thank Mr. Vikas Sawant, Shristi Mam, Dhaneshree mam and Prasoon Sir for their through out guidance and support.


Sunday 24 March 2019

Research Proposal

In every academic and professional field the research endeavorus are preceded by a research proposal. Research proposal is something that helps our research supervisor to know total research process that we propose to undertake,and also helps in examine, suitability and validity of the research. In any academic field, our research proposal will have to undergo number of approvals. Unless the approvals are provided we are not able to start our research process. Hence it is very important to study closely what constitutes in a research proposal. It is mandatory to have a research proposal in terms of both Qualitative and Quantitative research. Despite having a similar structure of proposal the difference lies between the methodologies and procedure followed to to conduct the research. 

Picture by - Siddhartha shukla


A research proposal is a overview plan of entire research work that is to be conducted. It is basically a designed strategy to find the solutions of problems and to conclude the objectives of the research. A research proposal should outline the various task you plan to undertake to full fill your research questions. Main function of research proposal is to have a detail operational plan for obtaining answers to the research questions. The research proposal should provide answers to the following stated important points

  1. What are we proposing to do
  2. how we plan to proceed
  3. why we selected the proposed strategy.

Contents of Research Proposal

A research proposal should contain the following information about the study
  1. Introduction (Including a brief literature review);
  2. Theoretical framework;
  3. Conceptual framework;
  4. Objectives or research questions;
  5. hypotheses to be tested, if applicable;
  6. Study design that we are proposing to adopt;
  7. Sampling design and sample size;
  8. Data-processing procedures;
  9. Proposed Chapters;
  10. Problems and limitations of study;
  11. Proposed time frame of the study.
A research proposal should communicate the purpose and plan of the research in such a way that;
  • Enables you to return to the proposal for your own guidelines in decision making at different stages of the research process;
  • Convinces your research supervisor to allow you to work on the research.

Some Important Points to be Considered

Introduction of Research Proposal

Generally  your research topic is introduced in 3 categories (i) Globally (ii) Nationally (iii) Locally.
Always start with a broad perspective of the main subject area you are going to work on, before gradually narrowing the focus to central problem. Always cover the area on following aspects

  • an overview of main area of your research study
  • historical perspective 
  • philosophical or ideological issues relating to topic
  • major theories
  • literature review
  • main problems, issues and advance under the topic
  • important theoretical & practical issues related to topic 
  • main findings relating to core issue.

Objectives of the study

The major points that your research is based on should be enlisted in this section. Always use action-oriented verb such as 'to determine','to find', & 'to ascertain' in formulating the objectives and sub-objectives. Also your objectives should be concluded in the conclusion with help of results and findings.

Hypotheses to be tested

A statement of assumptions about the prevalence of a phenomenon or about a relationships between two variables that you plan to test within the framework of your study is nothing but the hypothesis.
Hypothesis formulation have an obligation to draw conclusion about in report. 

Study Design

The study design should cover detail plan of proving/answering your research questions in descriptive, cross-sectional, before-and-after, experimental or non experimental design. Include all the details of various logistical procedures we intend to follow while executing the study design.

Work Schedule 

You must set a detail work time plan that must act as a guideline to conduct and finish your research within certain time frame.

3 Simple Steps to Create 3D Walkthrough using Navisworks

3D Walkthrough is created for an exciting experience to showcase exact replica of project that will be created in future. Walkthrough movie ...